Selenium Cucumber Step By Step
Automation batches starting soon...
Weekend batch :
Saturday Sunday
Lab - Live programming practice.... Code while explaining concepts.
- Assignments
Course content
Core Java and C# (Yes you will learn both)
Selenium + Cucumber/SpecFlow
Appium : iOS real device, Android mobile automation
Framework - Hybrid / Page object model / Custom POM
Maven / NuGet
JUnit / TestNG , NUnit / MBunit
Fees : Only 6.5K
Duration : 3-4 month or until course finish ( you can repeat in next batch without fees if not get at all in first attempt )
Trainer : Sugat Mankar 7+ years experience in Automation framework design and development
*Contributor to cucumber-jvm-parallel plugin for more info visit https://github.com/sugatmankar*
Contact : +917875500863
Location : Flat no 102, Span Residency, Magarpatta, Pune
1. Open IntelliJ
IDEA

2. File >> New >> Project >> Maven

3. Enter Groupid, Artifactid. Keep Version as it is or change if you want and click on Next

4. Keep these 2 fields as it is and click on Finish

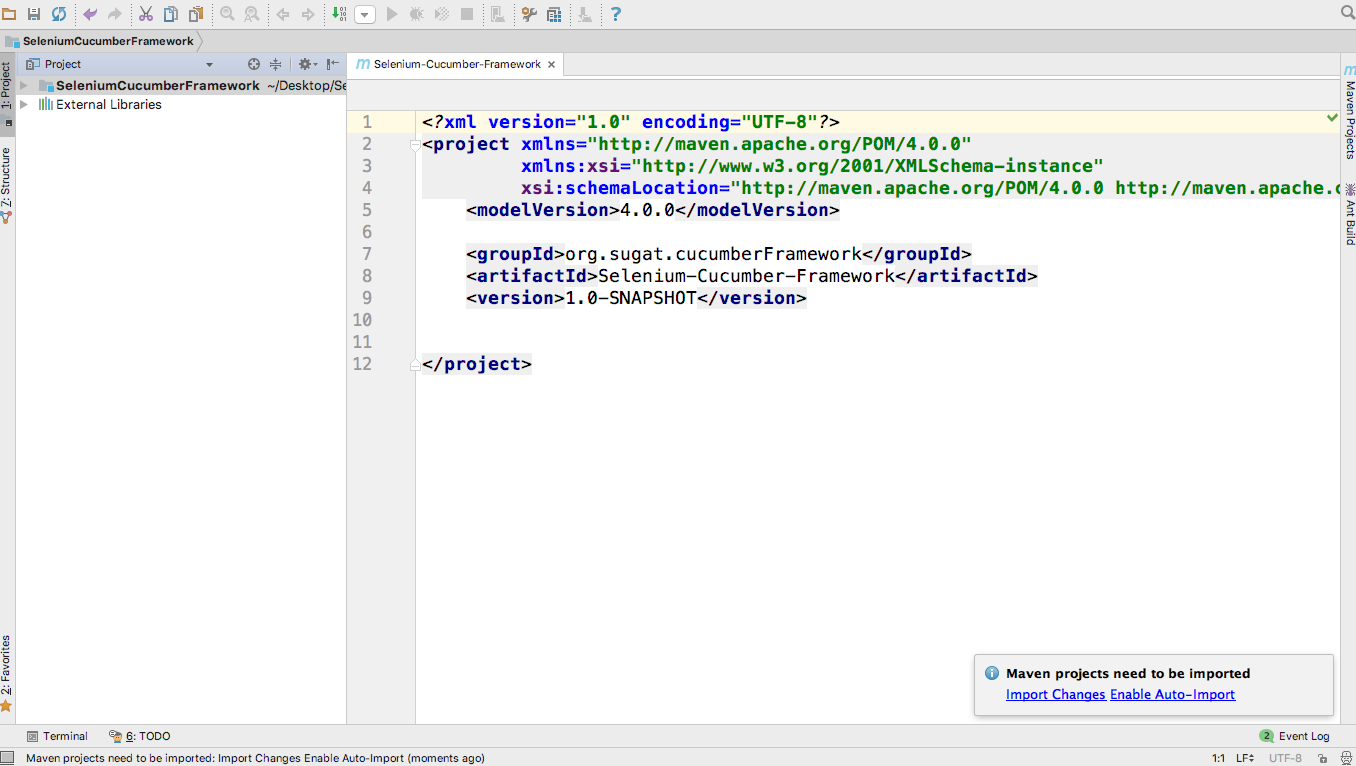
5. You will see project opened with default Project Object Model(POM) POM.xml file
6. Go to “https://mvnrepository.com/artifact/org.seleniumhq.selenium/selenium-java” page, copy dependency as it is and paste it into to (create a <dependencies> tag just below version tag) POM.xml file.

7. Add dependencies of Cucumber , Type “io.cucumber” in the search box and you will see below page. Copy dependencies of Junit,Gherkin,Core and java and paste it to POM.xml

8. Your POM.xml file looks like this

9. Delete src directory if you want your own source and resource directory


11. Create 2 directories. Code and resources

12. Right click on Code>>Mark Directory as>>Sources Root

13. Right click on resources>>Mark Directory as>>Resources Root

14. You will see Code and resources directories like this

15. Create 4 directories under resources directory as shown below

16. Right click on Code>>New>>Package

17. Give same name as Groupid which is given at the time of creating Maven project

18. Create 5 packages under cucumberFramework which are shown below
(org.sugat.cucumberFramework.core,
org.sugat.cucumberFramework.pageObjects,
org.sugat.cucumberFramework.stepDefinitions,
org.sugat.cucumberFramework.workFlow,
org.sugat.cucumberFramework.main)

19. Download required jars and exes for HUB and NODE start from seleniumhq.org if it is not already present

Start HUB

Start NODE

Read More here: http://www.seleniumeasy.com/selenium-tutorials/configure-selenium-grid-using-json-config-file
java -Dwebdriver.chrome.driver="chromedriver.exe"
-Dwebdriver.ie.driver="IEDriverServer.exe"
-Dwebdriver.gecko.driver="geckodriver.exe"
-jar selenium-server-standalone-3.4.0.jar
-role node -nodeConfig node1.json
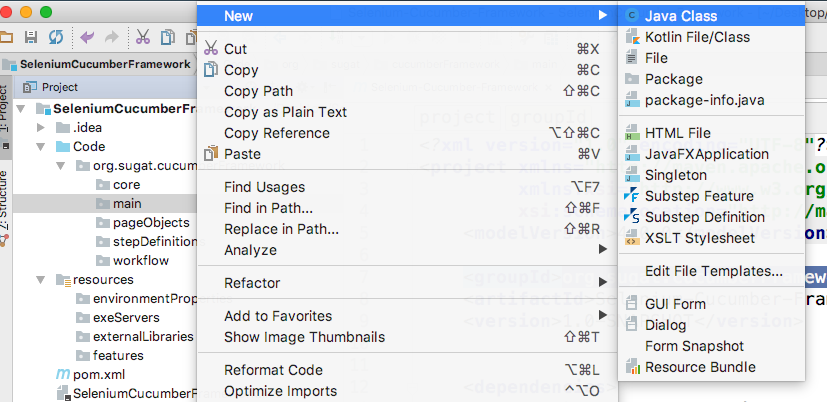
20. Right click on main>>New>>Java Class. Give name Runner.java
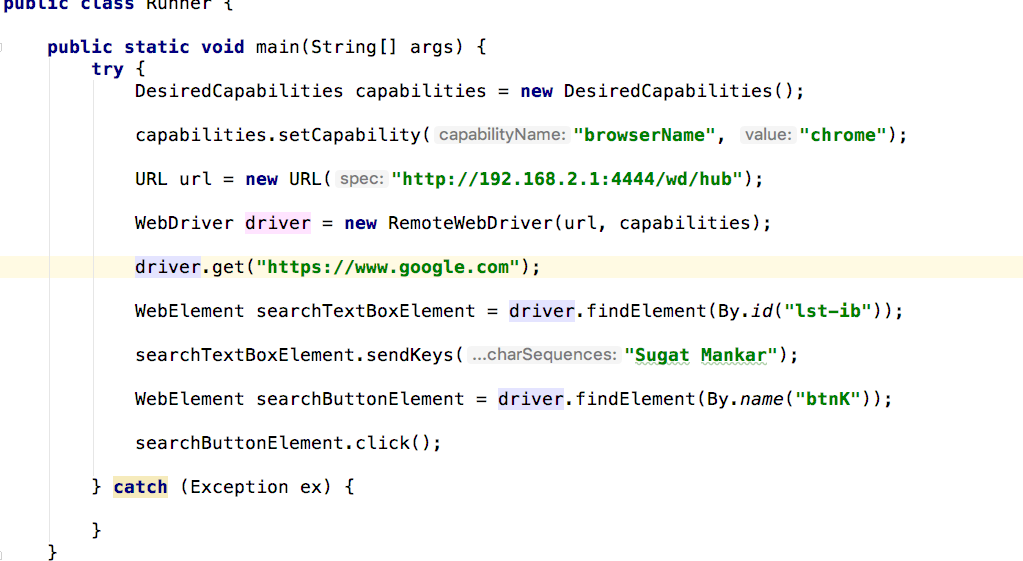
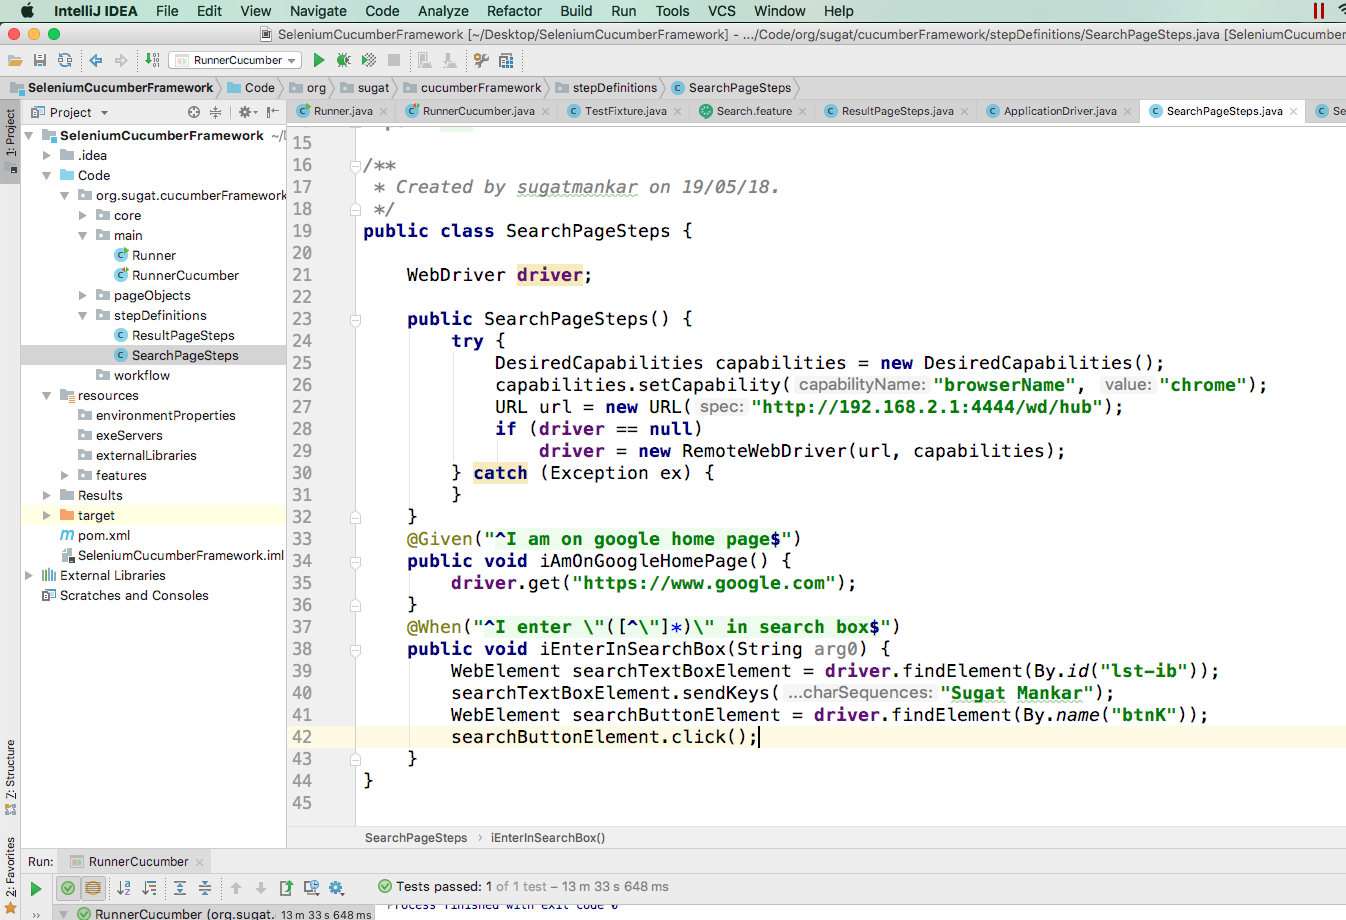
21. Java Selenium code for opening google page is written in Runner.java

22. Find attributes of google search box


23. Write code that will put value into the search box and click search button
24. Right click on features>>New>>File

25. Give name Search.feature and click OK

26. Click on Preferences on mac and click on File>>Settings on Windows and Linux

1 Cucumber
2 Gherkin
Click on Plugins. Enter “cucumber” and “Gherkin” in the search box and click on “Search
in repositories”.

28. Click on “Cucumber for Java” and Click on
Install

29. This pop up will
come if gherkin plugin is not install. Click on Yes and it will install both
cucumber and gherkin

30. After
installation click on “Restart intelliJ IDEA” button

31. If plugins are
not able to installed because of network block then click on “Install plugin from disk”
and select the path of those plugins
You have to download offline install plugin files from https://plugins.jetbrains.com/plugin/7212-cucumber-for-java

32. If you face this
popup then you need to upgrade your Intellij IDEA with latest version. This
pop up occurs when you have older version of Intellij IDEA and you are trying
to install plugin of latest version

33. Click on
File>>Settings>>Editor>>File Type>>Select “Cucumber
Scenario” from Recognized Files Types. If Registered Pattern block is empty
then click on “+” button, enter “*.feature” into the text box and click OK. You
will see the window like this.

34. Write Scenario/testcase
on below format in Search.feature file

35. Create Step
Definition File.
Put cursor on “Given”
word. You will see one light icon which is shown below. Click on that icon.
Then Click on “Create step definition”

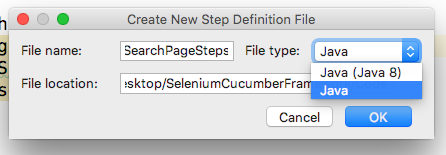
36. Give file name
to be created and select File type as “Java”. Do not change File location.
Click on OK. Move that file into the “stepDefinitions” folder
37. Same steps you
need to do foe “When” and “Then” words. But do not create new file. Just select
Step definition file which is created already

38. You will see
step definition file like this

39. Put each step related code form runner class to above SearchPageStep

40. Let’s Comments
above code inside all step definition methods and follow below steps

41. Add package name as glue
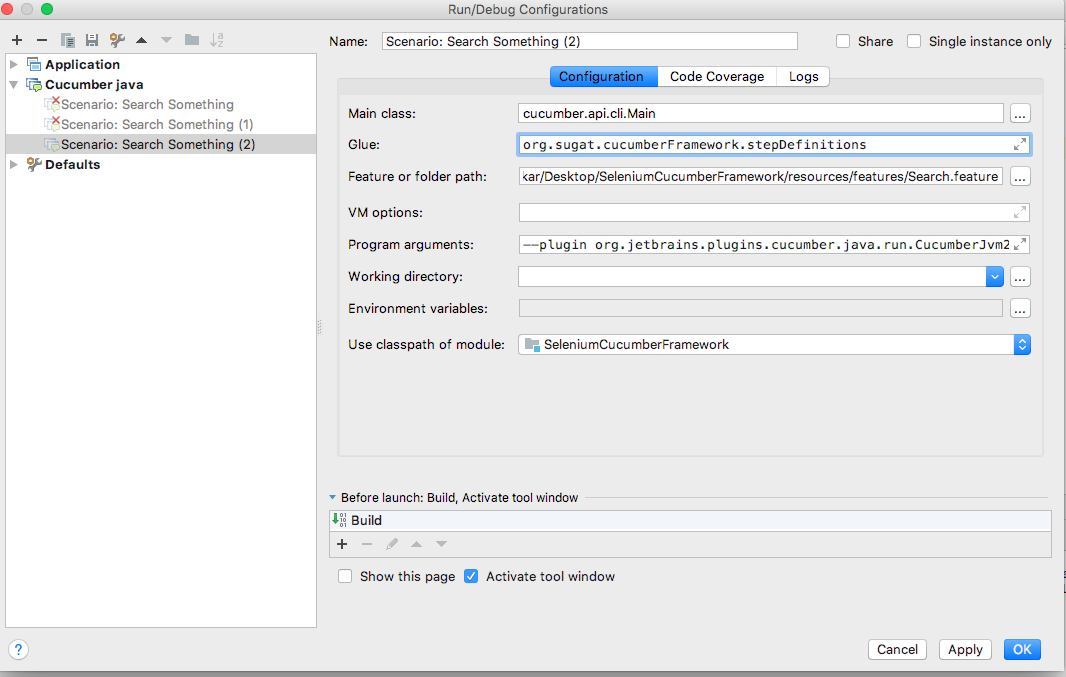
42. If step definitions are present in multiple
packages, add all packages in new line

43. Right click on Scenario and click on ‘Run Scenario’ in “Search.feature”file

44. After completion
of execution you will see Test Results at bottom left side of the page

45. You can write
more than one scenario in the same feature file and when you execute all scenarios by clicking on Feature then you will see the Test Result as shown below

46. Remove scope from junit dependency to access junit classes across the framework

48. Create “RunnerCucumber.java”
file and write below lines. Here you can see Cucumber Options. In “tags” you
can mention number of scenarios which you want to execute. In “glue” you need
to give path of stepDefinitions package. In “features” you need to give path of
features package. In “plugin” you need to give Result package and
TestOutput.html file path

49. Let’s remove comment
code to refactor our binding with webdriver

50. And add public
webdriver and constructor in above class (Cut code from Runner class and put in
above class)
51. In below scenario, first two steps belong to SearchPage and last two steps belongs to
ResultPage and we have created webDriver in Search page hence it will not
accessible in ResultPage

52. This is the
“ResultPageSteps.java” class. driver object is not accessible for this class

53. Hence to make
driver visible and singleton for all pages, we will create common class which
will inherited by all PageSteps as well as PageObjects classes, Create class
and cut driver related code from SearchPageSteps and put it in ApplicationDriver

54. Delete
RunnerClass as we are not using it now

55. We will run all
scenarios through junit runner class

56. Extend all
PageSteps using common ApplicationDriver class as shown below so that driver
object can be accessible to all other classes

57. SearchPageSteps
class extends ApplicationDriver

58. Let’s add PAGE
OBJECT MODEL with PageFactory in our framework for maintaining page objects
effectively
https://github.com/SeleniumHQ/selenium/wiki/PageFactory
Instead of
finding element in each method let’s keep it in separate class

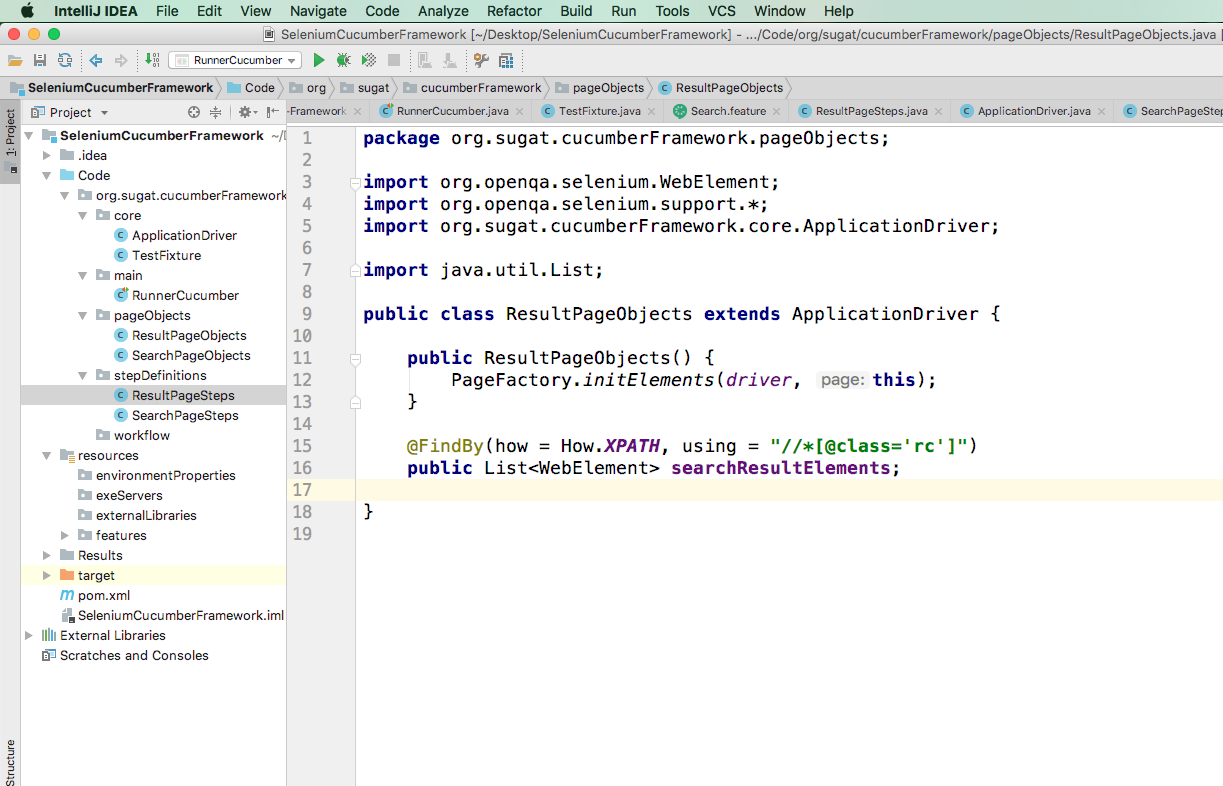
59. Create
SearchPageObject class and put all elements belong to page in below format, and
yes you have to initialize all elements present in current page hence it is
mandatory to put PageFactory.InitElements in constructor.

60. Now create
object of above class in StepDefinition class and use webelement as shown below

61. Similarly add for ResultPageObject and ResultPageSteps
class also

Now Run Your Scenarios and Enjoy. If you don't understand feel free to join class, i conduct it only on Saturday Sunday.
Weekend batch :
Saturday Sunday
- Lab - Live programming practice.... Code while explaining concepts.
- Assignments
Course content
1 Core Java and C# (Yes you will learn both)
2 Selenium + Cucumber/SpecFlow
3 Appium : iOS real device, Android mobile automation
4 Framework - Hybrid / Page object model / Custom POM
5 Maven / NuGet
6 JUnit / TestNG , NUnit / MBunit
Fees : Only 6.5K
Duration : 3-4 month or until course finish ( you can repeat in next batch without fees if not get at all in first attempt )
Trainer : Sugat Mankar 7+ years experience in Automation framework design and development
*Contributor to cucumber-jvm-parallel plugin for more info visit https://github.com/sugatmankar*
Contact : +917875500863
Location : Flat no 102, Span Residency, Magarpatta, Pune
No comments:
Post a Comment